Nutrition with Elena, LLC
  • Home
  • About
  • Work with me
    • Services
    • Classes & Events
  • Discover the Thermomix
  • Contact
  • Blog
  • Services
  • Home
  • About
  • Work with me
    • Services
    • Classes & Events
  • Discover the Thermomix
  • Contact
  • Blog
  • Services

Blog

Chickpea Flour Wrap with Cashew Cream

5/13/2020

0 Comments

 
Picture
Picture
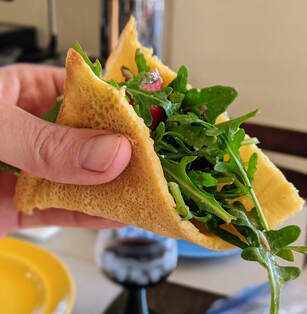
This gluten-free and vegan wrap is so delicious and can easily be modified to create your own personal favorite version. Chickpea "pancakes" are popular in France and Italy and are also known as socca or farinata. 

Chickpea flour is one of my must-have power foods in my pantry. It is high in protein and fiber and can be used in so many different ways. It acts as a binder and can be used as an egg replacement (for a vegan Frittata for example), you can thicken up soups and stews with it and make delicious breads and wraps like the one that you see in the picture above. Be advised though, do NOT try chickpea flour in its raw form! It tastes awful and might make you not want to proceed with the recipe. However, once cooked, it is absolutely delicious!

As for the batter, some sources suggest to scoop off the foam that develops after mixing (see picture below) to aid with better digestion and less bloating. I personally haven't noticed a difference with or without scooping the foam off but thought it's worth mentioning. 

When cooking the batter, I prefer adding very little batter and swirling it around to spread it all over your preheated pan. This way you get more of a tortilla/wrap-like texture. If you prefer more of a fluffy pancake texture, you may want to experiment and try adding more batter to your pan. 
Picture
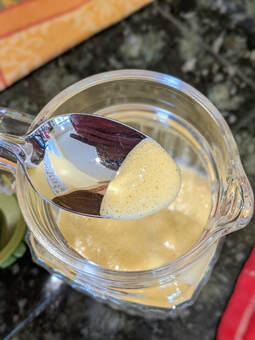
Ingredients (for chickpea wrap):
  • 1 cup chickpea flour 
  • 1 cup plus 2 tbsp warm water
  • 3/4 tsp salt
  • 1/8 tsp cumin
  • 1.5 tbsp olive oil
  • 1 tbsp nutritional yeast
  • 1/2 tsp garlic powder
Instructions: 
  1. Mix together all of the ingredients until well combined and no clumps are left. You can also use an immersion blender or regular blender to mix it all up. 
  2. Let batter rest for at least 2 hour, covered, at room temperature. 
  3. Preheat your oven to 450 degree F with the broiler setting on. 
  4. Oil your oven-proof pan and place in oven for a few minutes to preheat. 
  5. With mittens, take preheated pan out of oven and pour small amount of batter (this batter should yield about 4 wraps depending on the size of your pan) so that it covers your pan thinly after swirling it around. 
  6. Place back in oven and let cook for about 5 minutes but keep checking (every oven cooks slightly different). You want to take it out once it is firm and starts to brown. 

Ingredients (for cashew cream):
  • 2 cup cashews (soaked for at least 2 hours or longer, rinsed & drained)
  • 1 cup filtered water
  • 1 Tbsp nutritional yeast
  • 1 tsp miso (make sure to get gluten-free if needed)
  • 1 tsp salt 
  • 1 Tbsp apple cider vinegar
Instructions: 
  1. Place about half of the water and all of the other ingredients in a high-speed blender. Alternatively, use an immersion blender but you may need to add more water to get it smooth. 
  2. Blend everything until you achieve a very smooth consistency. You may need to stop your blender and scrape down the sides. Also, start with half of the water and gradually add more until you achieve the consistency that you like. 

*Notes:
- I like to spread the cashew cream on my wrap and then fill it with salad or grilled vegetables. There are so many possibilities though! Add Harissa, sundried tomatoes and smoked paprika to the cream or fill the wrap with cooked lentils. Keep experimenting and let me know what fun ideas you guys come up with!
- Chickpea wrap inspired by this socca recipe by David Lebovitz. 
0 Comments

Creamy Hummus (Better Than Store-Bought)

4/26/2020

1 Comment

 
Picture
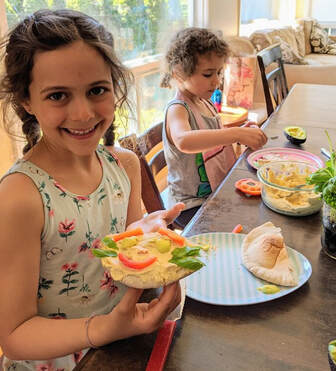
It is so easy and so much cheaper to prepare hummus from scratch. My kids love hummus now that we've started making it at home. They especially love the idea of making their own hummus faces. To create hummus faces, we simply cut up a variety of vegetables into different shapes and use any bread that we have to spread the hummus on. Bagels and Pita bread works especially well!

A few tips and tricks that I have found make homemade hummus tastier.
  • Use good tahini. When tahini has separated and the oil is swimming on top and it is hard to mix the oil back into the solid part, it is likely that the tahini is too old. Also make sure to taste your tahini! It should have a pleasant bitter taste. I buy my tahini at a local Mediterranean grocery store and really love the brand al wadi.
  • Always use freshly squeezed lemon juice. Bottled lemon juice is typically dull tasting!
  • Use ice cold water when adding it to your tahini mixture. I like adding a few ice cubes to my water before adding it to the food processor. Ice cold water contributes to a fluffier hummus!

Ingredients: 
  • 1 (15oz) can chickpeas, rinsed and drained
  • juice of 1 lemon (3 tablespoons or more)
  • 1 clove of garlic, roughly chopped or minced
  • 3/4 teaspoons salt
  • 1/3 cup tahini
  • 2 - 4 tablespoons ice water, more as needed
  • 1/4 - 1/2 teaspoon ground cumin 
  • 2 tablespoon olive oil
  • paprika or Sumac and more olive oil for optional decoration
Instructions: 
  1. In a food processor, combine garlic, lemon juice and salt and process
  2. Add the tahini to the food processor and puree until the mixture is combined and thickens. 
  3. While food processor is running, add the iced water in a slow stream. 
  4. Now add the chickpeas, cumin, and olive oil and blend for about two minutes or until mixture is creamy.
  5. Stop and scrape down the sides as need and taste. You may need to add a tiny bit more water, lemon juice.
  6. Transfer to a bowl and create a swirling pattern with a big spoon or spatula. Then drizzle a bit of olive oil on top and sprinkle with paprika or Sumac. 
1 Comment

Best Bolognese Sauce - Traditional or Vegan

4/4/2020

0 Comments

 
Picture
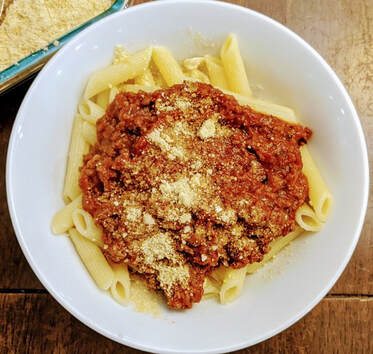
This is a family favorite and always a hit for feeding a big crowd. As I teach cooking lessons to a lot of students with various dietary restrictions, I wanted to create a vegan version of my favorite Bolognese sauce. In my humble opinion, the vegan version is just as delicious and has been a big hit in one of my recent vegan cooking classes. 

Ingredients: 
  • 1 lb ground meat (beef or pork)
  • 3-4 garlic cloves, minced
  • 1 tablespoon salt
  • 1 tablespoon honey
  • 2 teaspoons cumin
  • 1/2 teaspoon chili powder (or more for a little spice)
  • 2 tablespoons basil
  • 2 tablespoons oregano
  • 1 teaspoon cinnamon
  • 1 onion, diced
  • 3-4 oz tomato paste
  • about 46 oz of diced tomatoes (or pureed)
  • finely chopped vegetables, optional but recommended: 1 cup mushrooms, 1-2 zucchini, 1 bell pepper
  • optional: broth or red wine for deglazing
Ingredients for Vegan Bolognese: 
All of the ingredients above, except ground meat. Substitute with: 
  • 1/2 cup walnuts chopped finely in food processor
  • add an additional cup of mushrooms --> total of 2 cups mushrooms
  • 1-2 cups cooked lentils (I prefer brown lentils but any type works)
Instructions:
  1. Heat large pot and then add oil.
  2. Once oil is hot, saute onions until translucent. Then add spices, salt and garlic and saute for another 2-3 minutes but make sure not to burn the garlic!
  3. Add any other vegetables that you want to add and saute together until softened.
  4. Now add honey and tomato paste and "brown" it with the vegetables for about 3-4 minutes. This will also improve the flavor of the dish instead of adding it later on with the liquids. Don't worry if some of it sticks to the bottom!
  5. Deglaze any brown bits on the bottom of the pot with a few splashes of red wine or broth. Just add liquid to pot and scrape up any brown bits. This will add richness and more flavor to your dish. 
  6. Depending on how big your pot is, you could try to add the meat and brown it or transfer your vegetables to another dish and then brown your ground meat. (if you are making a vegan version, add your lentils and walnuts instead of the ground meat)
  7. Once meat is browned well, add vegetables back to pot and add diced tomatoes. 
  8. Cook for at least 1-2 hours on low heat. The longer it cooks, the better it will taste. Enjoy!

Ingredients for Cashew "Parmesan" Cheese:
  • 1 cup raw cashews
  • 1 teaspoon garlic powder
  • 1 teaspoon salt
  • 3-4 tablespoons nutritional yeast
Instructions: 
  1. Place everything in a food processor or blender and process until powdery. If using a blender, make sure not to process too long, otherwise it will become clumpy. 
  2. Store in a sealed container in the refrigerator. 


0 Comments

Red Lentil Coconut Curry

3/25/2020

0 Comments

 
Picture
Ingredients:
  • coconut oil  or other oil for cooking
  • 2 garlic cloves, minced
  • 1 tablespoon minced fresh ginger 
  • 1 small onion, chopped
  • 2 teaspoon curry powder
  • 1 teaspoon turmeric powder
  • 2 cups canned coconut milk
  • 2 cups broth
  • 1.5 cups dried red lentil
  • 1/2 cup chopped cashews
  • 1/4 cup unsweetened shredded dried coconut
  • 1 tablespoon cilantro
  • 2 cups frozen green peas (or mixed vegetables)
  • salt and pepper to taste
Instructions: 
1) Heat oil in a large skillet or pot over medium heat and saute onions until translucent
2) Add garlic and minced ginger and saute for another 30 seconds until fragrant. Avoid burning garlic!
3) Stir in curry powder, turmeric, and salt and saute for another 30 seconds.
4) Add coconut milk, broth, and cashews 
5) Rinse your lentils and then add them to the pot. Reduce heat and cook for another 15-20 minutes or until lentils soften. 
6) Stir in frozen vegetables, shredded coconut and cook for 3-5 minutes. 
7) Add lemon juice, and more salt and pepper to taste. 
8) Serve by itself or over rice, quinoa or millet. Top with chopped cilantro. 

0 Comments

Nutritious Oat Chocolate Chip Cookies

3/22/2020

0 Comments

 
Picture
These cookies have been a great success with my family and in my cooking classes with kids and adults. The recipe is very forgiving, meaning you can play with the ingredients and make modifications and it still always turns out just fine. For example, I have used leftover pumpkin seed pulp from making a pumpkin seed milk in place of ground pumpkin seeds and it turned out so delicious both times. I hope you enjoy these nutrient packed cookies as much as we do. 
Ingredients:
  • 2 bananas, ripe, mashed
  • 1 teaspoon vanilla extract
  • ¼ cup coconut oil, slightly heated
  • 2 cups rolled oats*
  • 1-2 tablespoons maple syrup or other sweetener
  • 1/3 cup ground pumpkin seeds/almond flour/or pulp from pumpkin milk
  • 1/3 cup cacao powder
  • 1/3 cup coconut, finely shredded
  • ½ teaspoon salt
  • 1 teaspoon baking powder
  • 1/2 teaspoon cinnamon
  • 1/2 teaspoon turmeric 
  • 5 oz chocolate chips
  • 1-2 teaspoon Chaga mushroom powder (optional)
Instructions: 
  1. Preheat oven to 350 degrees, racks in the middle or top of oven
  2. In a large bowl combine the bananas, vanilla extract, maple syrup, and heated coconut oil.
  3. In another bowl, combine rest of the ingredients except chocolate chips. Mix dry ingredients until well combined and then add into wet ingredients. Mix everything together. If using seed pulp, use your hands to mix everything well together 
  4. At the end, fold in chocolate chips.
  5. Drop dollops of dough, each about 1-2 tablespoons in size, an inch apart, onto a parchment lined baking sheet.
  6. Bake for about 13-15 minutes or until golden on the bottoms. The cookies will fall apart if you try to pick them up right after taking them out of the oven so make sure to let them rest on the baking sheet for a few minutes and let them cool down before eating them. 
*Notes:
 - If you can’t have oats, try flattened rice, also called beaten rice or Rice Poha (found in Indian stores or Amazon). T
 - To sweeten the cookies, you can also use chopped dates instead of maple syrup
 - Store cookies in airtight container on counter for up to 3 days or store in fridge for up to 5 days. I think these cookies taste best straight out of the refrigerator. 
 - Inspired by the healthful double chocolate cookies recipe from 101 cookbooks


0 Comments

Strawberry, Beet, and Rose Cashew Milk

3/2/2020

3 Comments

 
Picture
Making your own plant-based milks is actually quiet simple. All you need is a blender, ideally a high-speed blender and your ingredients. For some nuts, you also need a nut milk bag to strain the milk and get a smoother consistency. Cashews are soft and after soaking, they pulverize completely in a high-speed blender that no straining is needed. 

Below is my basic cashew milk recipe or for an extra flavor and nutrient boost, try my strawberry, beet, rose milk version. This recipe was a big hit in a recent plant-based milk workshop I taught. 

Ingredients for Basic Recipe: 
  • 1 cup cashews (soaked for at least 4 hours or overnight in fridge)
  • 3 cups water (filtered for best flavor)
  • 1 pinch salt
  • 3 tablespoons maple syrup 
  • 1 teaspoon vanilla extract
Ingredients for Strawberry, Beet, Rose Cashew Milk: 
  • 2 cups of basic cashew milk
  • 1 cup strawberries, raw or thawed, previously frozen
  • 1/2 teaspoon beet powder
  • 1/2 fl. oz of rose scented water
Instructions:
  1. Drain and rinse soaked cashews and throw in blender along with water, salt, maple syrup, and vanilla. 
  2. Blend everything on high speed for about 2 minutes or until smooth. 
  3. No need to strain this milk but if you want to achieve an even smoother consistency, you can try to strain it through a nut milk bag. 
  4. For strawberry, beet, rose flavored milk, take 2 cups of the basic cashew milk and add strawberries, beet powder, and rose water and blend until combined and smooth. 
  5. Enjoy as is or over ice. Decorate with a mint sprig and/or coconut flakes. You can store this milk in the fridge for 2-3 days but make sure to shake it well before consumption as it will separate over time. 
3 Comments

EASY DESSERT THAT'LL WOW ANY CROWD

2/2/2020

0 Comments

 
Almond Stuffed Chocolate Covered Dates
This is one of my favorite desserts because it is
a) simple & nutritious
b) doesn't require much time or special kitchen tools and
c) It's so delicious that people will contact you to find out about the recipe if you make this for a potluck or dinner party. 
Picture
Servings: 10
Prep time: 20 minutes
Ingredients:
  • 10 dates 
  • 1/4 cup almond butter (peanut butter, sunflower butter or others work too)
  • 10 almonds (or any other nuts work too like walnuts, pistachios, etc.)
  • 1 cup dark chocolate chips
  • 1 tsp coconut oil
  • Maldon Sea Salt (for decorating)
Instructions:
  1. Pit dates and open up dates only half-way so that you can add fillings
  2. Using a small spoon, scoop in a small amount of almond butter and place one nut in the middle of each date and press dates together slightly. 
  3. Once all dates are filled, prepare your chocolate. Place chocolate chips and coconut oil in a microwave-safe dish. Place bowl with chocolate chips in microwaves and heat at 20-second intervals, making sure to stir chocolate chips in between each interval so not to burn chocolate chips. Once most chocolate chips are melted, keep stirring until everything is completely melted and combined. 
  4. Prepare a plate with parchment paper
  5. With a fork and spoon, dip dates into chocolate until covered. Then remove from chocolate and set on parchment paper covered plate and immediately sprinkle a small amount of Maldon sea salt on top. 
  6. Once all dates are covered in chocolate, place them in the fridge to allow chocolate to harden completely. 
  7. You can either serve the chocolate covered dates whole or cut them in half. Enjoy!
0 Comments

    Author

    Write something about yourself. No need to be fancy, just an overview.

    Archives

    May 2020
    April 2020
    March 2020
    February 2020

    Categories

    All
    Appetizer
    Beet
    Bolognese
    Cake
    Cardamom
    Cashew
    Chickpea Wrap
    Cookies
    Creamy Hummus
    Dairy Free
    Dates
    Dessert
    Dinner
    Easy Family Dinner
    Family Meals
    Frittata
    Gluten Free
    Healthy
    Healthy Food
    Healthy Lunch
    Hummus
    Kid Friendly
    Lentils
    Lunch
    Outside Play
    Picky Eater
    Pistachio
    Plant Based Milk
    Rose
    Strawberry
    Vegan
    Vegetable

    RSS Feed

Nutrition with Elena, LLC
Nutrition Made Simple​
MENU
Home
About


Resources
Blog
​Policy & Terms
CONNECT


​Copyright 2020 Nutrition with Elena, LLC. All Rights Reserved. Privacy & Terms.